組込みからPC、サーバ、スマホまで、実験的に開発中。
未分類

UbuntuのPHP+NginxでリモートなXdebug (2) Xdebugインストール
0まずはPECLを使うためにphp5-devをインストールします。
binutilやら何やらも必要になるので、-yオプションを付けて一気に済ませてしまいましょう。
$ sudo apt-get install -y php5-dev
次に、PECLでXdebugをインストール。
$ sudo pecl install xdebug
aptでphp5-xdebugを入れても良いのですが、私はより新しいバージョンを使うためにPECLからのインストールを選択しました。aptで入れればbinutilなどのリソースを省けるので、どちらを選ぶかはお好みで。
2016/01/08 追記 ubuntu14.04では、-Zオプションが必要です。
$ sudo pecl install -Z xdebug
Xdebugをインストールしたら/etc/php5/mods-available/xdebug.iniを作成します。
|
1 2 3 |
zend_debuger=xdebug.so xdebug.remote_enable=On xdebug.remote_connect_back=On |
xdebug.remote_connect_back=OnはすべてのホストからサーバのXdebugに接続できるようにします。
リモートデバッグするホストを特定の1台に限る場合は、代わりにxdebug.remote_host="nnn.nnn.nnn.nnn"と記述しておくと安全です。
FPM経由でXdebugを有効にするため、/etc/php5/fpm/conf.d/20-xdebug.iniからリンクを張ります。
$ sudo ln -s /etc/php5/mods-available/xdebug.ini /etc/php5/fpm/conf.d/20-xdebug.ini
設定は以上です。FPMを再起動します。
$ sudo service php5-fpm restart
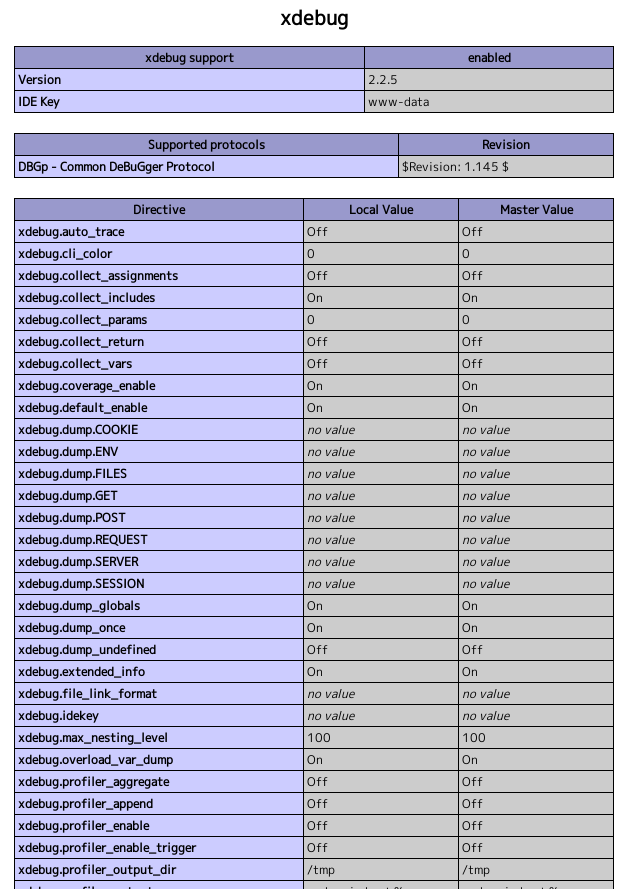
ブラウザでphpinfo.phpを開き、Xdebugが有効になっていれば設定は完了です。

UbuntuのPHP+NginxでリモートなXdebug (1) Nginx PHP対応
0ローカルPCのEclipseからサーバ上のPHPをリモートデバッグします。
PHP環境はすべてサーバ側に置き、ローカルはEclipseとプラグインだけにして軽量化、PHPコードもサーバ上だけに一元化します。
UbuntuのバージョンはServer14.04。PHP5とNginxはaptでインストール済みとします。サーバーのIPアドレスはstaticです。
まずはFPM(FastCGI Process Manager)をインストールします。
$ sudo apt-get install -y php5-fpm
NginxをPHPに対応させるため、/etc/nginx/sites-available/defaultを編集します。
変更は3ヶ所。インデックスファイル名追加とサーバー名設定、それからコメントアウトされているPHPの設定を有効に。
|
1 2 3 4 5 6 7 8 9 10 11 12 13 14 15 16 17 18 19 20 21 22 23 24 25 26 27 28 29 30 31 32 33 34 35 36 37 38 39 40 41 42 43 44 |
--- /etc/nginx/sites-available/default.org 2014-07-21 15:20:37.320471527 +0900 +++ /etc/nginx/sites-available/default 2014-07-21 16:18:24.240252118 +0900 @@ -22,10 +22,10 @@ listen [::]:80 default_server ipv6only=on; root /usr/share/nginx/html; - index index.html index.htm; + index index.php index.html index.htm; # Make site accessible from http://localhost/ - server_name localhost; + server_name 192.168.2.18; location / { # First attempt to serve request as file, then @@ -51,17 +51,17 @@ # pass the PHP scripts to FastCGI server listening on 127.0.0.1:9000 # - #location ~ \.php$ { - # fastcgi_split_path_info ^(.+\.php)(/.+)$; - # # NOTE: You should have "cgi.fix_pathinfo = 0;" in php.ini - # - # # With php5-cgi alone: - # fastcgi_pass 127.0.0.1:9000; - # # With php5-fpm: - # fastcgi_pass unix:/var/run/php5-fpm.sock; - # fastcgi_index index.php; - # include fastcgi_params; - #} + location ~ \.php$ { + fastcgi_split_path_info ^(.+\.php)(/.+)$; + # NOTE: You should have "cgi.fix_pathinfo = 0;" in php.ini + + # With php5-cgi alone: + #fastcgi_pass 127.0.0.1:9000; + # With php5-fpm: + fastcgi_pass unix:/var/run/php5-fpm.sock; + fastcgi_index index.php; + include fastcgi_params; + } # deny access to .htaccess files, if Apache's document root # concurs with nginx's one |
server_nameにはサーバーのホスト名かIPアドレスを設定します。ここではひとまずIPアドレスで良いでしょう。この例では192.168.2.18です。
コメント中に「php.iniに”cgi.fix_pathinfo = 0;”と書け」とあるのでそのようにします。
|
1 2 3 4 5 6 7 8 9 10 11 |
--- /etc/php5/fpm/php.ini.org 2014-07-21 16:16:42.932251102 +0900 +++ /etc/php5/fpm/php.ini 2014-07-21 16:17:02.096251294 +0900 @@ -765,7 +765,7 @@ ; of zero causes PHP to behave as before. Default is 1. You should fix your scripts ; to use SCRIPT_FILENAME rather than PATH_TRANSLATED. ; http://php.net/cgi.fix-pathinfo -;cgi.fix_pathinfo=1 +cgi.fix_pathinfo=0 ; FastCGI under IIS (on WINNT based OS) supports the ability to impersonate ; security tokens of the calling client. This allows IIS to define the |
設定確認のためのphpinfo.phpをNginxのドキュメントルート/usr/share/nginx/htmlに置きます。
|
1 2 3 |
<?php phpinfo(); ?> |
設定が済んだらNginxとFPMを再起動します。
$ sudo service php5-fpm restart

$ sudo service nginx restart
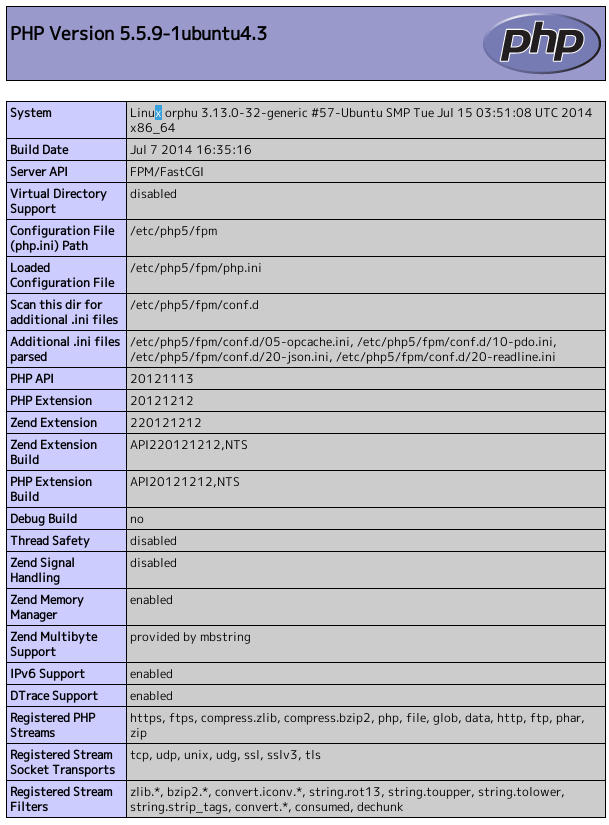
ブラウザでhttp://hostname/phpinfo.phpを開き、下のような画面が表示されれば設定は完了です。
TokyoCabinet/TokyoTyrantを使う (1) インストール
0ubuntuならaptでインストールできますが、ここではソースコードからビルドしてみます。
ソースのtarボールをダウンロードしたら、適当なディレクトリに展開して一気にビルド&インストールしちゃいましょう。
まずはTokyoCabinetから。
|
1 2 3 4 5 6 |
$ wget http://fallabs.com/tokyocabinet/tokyocabinet-1.4.48.tar.gz $ tar xzf tokyocabinet-1.4.48.tar.gz $ cd tokyocabinet-1.4.48 $ ./configure $ make $ sudo make install |
configureで「bzlib.hが無い」と言われた場合は、libbz2-devをインストールします。
libbz-devで検索しても見つからないので注意してください。
続いてTokyoTyrant。
|
1 2 3 4 5 6 |
$ wget http://fallabs.com/tokyotyrant/tokyotyrant-1.1.41.tar.gz $ tar xzf tokyotyrant-1.1.41.tar.gz $ cd ../tokyotyrant-1.1.41 $ ./configure $ make $ sudo make install |
インストールができたら、サーバを起動して、データを格納してみましょう。
|
1 2 3 4 5 6 7 8 9 10 11 12 13 14 15 16 |
$ sudo /usr/local/sbin/ttservctl start # サーバ起動 $ telnet localhost 1978 # telnetでlocalhostのポート1978にアクセス Trying 127.0.0.1... Connected to localhost. Escape character is '^]'. set foo 0 0 4 hoge STORED get foo VALUE foo 0 0 4 hoge END ^] telnet> quit Connection closed. $ sudo /usr/local/sbin/ttservctl stop # サーバ停止 |
上記の例では、memcachedプロトコルを使って、キー’foo’の値として4文字のデータ’hoge’を格納しています。
‘^]’はCtrl+]です。
このままではその都度サーバを起動しなくてはならないので、起動スクリプトを作りましょう。
|
1 2 |
$ sudo ln -s /usr/local/sbin/ttservctl /etc/init.d/ttservd $ sudo /usr/lib/insserv/insserv ttservd |
ttservctlの実体はttserverの起動スクリプトです。この例ではttservdという名前でリンクを張っています。
このスクリプトはなぜかttserverが配置されている/usr/local/binにパスが通っていなくて、OS起動時の自動起動に失敗するので、パスの記述を追加しておきます。
28行あたり。PATHの設定に/usr/local/binを追加します。
|
1 2 3 4 5 6 7 8 9 |
--- /usr/local/sbin/ttservctl.orig 2014-06-14 19:16:11.559197736 +0900 +++ /usr/local/sbin/ttservctl 2014-06-14 19:16:48.019197078 +0900 @@ -25,7 +25,7 @@ # setting environment variables LANG=C LC_ALL=C -PATH="$PATH:/sbin:/usr/sbin:/usr/local/sbin" +PATH="$PATH:/sbin:/usr/sbin:/usr/local/sbin:/usr/local/bin" export LANG LC_ALL PATH |
OSを再起動して動作確認してみましょう。
|
1 2 |
$ tcrmgr get localhost foo hoge |
TokyoCabinetのデータはファイルに永続化されているので、再起動のあともさきほど格納したキーfooの値hogeが保持されています。